Invited By Lama Works

Visit the all new website Invited by Lama Works to find out more about my store!

Wednesday, July 6, 2011

What We Eat Wednesday

Eating this week is a tad bit different than most.  The rule is – I’m not allowed to use my counters this week.  I’m not telling you why .. you’ll have to wait until next week to find out (ooohhh, feel the suspense building???).  So this week I’m using a bit of freezer cooking thanks to Once A Month Cooking (OAMC) and doing a little bit of my own mini freezer cooking.  I’m using 2 freezer meals and one slow cooker meal.  The other 3 meals are all from OAMC, but instead of making a big day of it, I spent the morning throwing two of them together.  They are sitting in my fridge and ready to pop in the oven as soon as we are ready to eat them.  The third I need leftover chicken from a slow cooker meal to make, so we’ll have to make that one on the kitchen table.  Intriguing, hey?

So here’s the plan:

Sunday – 4th of July BBQ at Quincy Country Club

Monday – Stuffed Peppers with Tomato Basil Cream Sauce (made ahead, ready to cook!)

Tuesday – Spaghetti Pie (made ahead, ready to cook!)

Wednesday – Greek Chicken (slow cooker)

Thursday – Chicken Parm Wraps (use leftover chicken)

Friday – Steak with twice baked potatoes (OAMC)

Saturday – Chicken Fajitas (OAMC – May Traditional Menu)

So even though I can’t really use my kitchen to it’s full capacity, I still can use it and don’t have to go out to eat all week.  Saves us calories and money, that’s for sure. We’re a happy family when we eat home cooked food and have some extra cash.

Stay tuned for more updates on the kitchen!

Until the next time…
The girl behind the lama
~LMM

Pin It!

Tuesday, July 5, 2011

The Power Goes Out–The Food Must Go On!

So yeah, having your power go out is a pain in the butt.  Especially when it’s fro a full 48 hours, you have a refrigerator full of food, meals planned and are trying to stick to your weekly budget. I must say that we surmounted all of the hurdles and ended up just fine!  We are so grateful to our wonderful neighbors that plugged our fridge and freezer into their generator. Without them, we would have lost everything.

We had some Apple Oatmeal Pie Bars in the freezer that were easy to defrost for breakfast.  We did go out to lunch both days, but that was more to be social and share storm stories with our friends.  The biggest challenge was dinner.  Dinner out gets expensive.  I had all sorts of meat and veggies in the fridge that were just begging to be cooked!  Well, I’m a Wisconsin girl and grew up camping and vacationing to our cabin in the woods.  I’m no stranger to cooking over an open fire, or in this case a grill. 

Remember how I was going to make Slow Roasted Beef with Tomatoes? Oh, did I make it!  Camper pack style!  I took all the basic ingredients:

Beef round roast, carrots, celery, onions, baby Yukon gold potatoes, olive oil, steak seasoning, butter, garlic, rosemary and tomato paste.

Cut everything into small pieces, threw in an ice cube (for steam) and placed them onto large pieces of foil.

IMG_5594

I rolled them all up into little packets and the Mr. threw them on the grill for about 35-40 minutes.  Once they are done, you smush them around a little bit to distribute the seasonings and you magically have dinner!

IMG_5597

This was actually one of the best dinners we’ve had in a long time.  I loved that the potatoes and meat got a little crispy, but everything was nice and soft and juicy.  YUM! 

We actually did the same thing the following night with the garlic lime pork chops.  We cooked the chops as is, but made little packets of potatoes with some chili powder and cumin.  Not bad for not having power right?  We used the food we had, saved money, and had our own little camping adventure.  We topped each night off with game night by candle light and we actually kind of had fun!  It was a nice way to regroup and bond a little as a family.  I did feel a little disconnected from the world and missed catching up on the news, but it was definitely fun.

What do you do when the power goes out??

Until the next time …
The girl behind the lama
~LMM

Pin It!

Monday, July 4, 2011

The Great Kitchen Facelift–Weekend #2

So last weekend we did some simple, but very effective changes. We swapped out the dated light fixtures and drawer pulls.  What does weekend #2 bring?

This weekend was a great adventure in wallpaper removal.  Yay?  It has been one of the most drastic changes we’ve tackled, yet was also one of the more annoying tasks.  We were lucky, really lucky.  This lovely wallpaper:

IMG_5581

has been up in this kitchen at least since 1983, we think it could even be 10-20 years beyond that.  Based on the family historians recollection and the order that additions and extra cabinets were added .. it’s pretty old. It was actually very charming wallpaper and we thought about keeping it up, but since it was so … vintage … it had rips on the corners and stains from some decorations that had been hanging there for years.  It also had about 30 years of kitchen grease and grime built up.  I knew it was dirty, but until I held a piece in my hand I  don’t think I had realized just how disgusting and grimy it was.  It needed to go.

But, since it was put up back during a time where things weren’t so flimsy and cheap it was high quality wall paper and was pretty easy to take down. The Mr. scored it around all the doors and molding and I just started peeling.

IMG_5579

Easy as that.  No water, no scraping … it just came down in sheets.  Lovely!  We soon discovered that there was lovely mint green paint behind the wallpaper.  It shouldn’t have surprised us.  It must have been on sale at one point as it also happens to be the inside color of the cabinets, and the color of the basement stairwell. 

Then we got to the fun part – removing the glue!  Ugh.  I’m glad this was so easy, but I’m really dreading the other two rooms in the house that are covered in wallpaper.  We might just consider painting over that wallpaper like we did in the guest room.  So having never done this before we did a little research and found that the glue can come off with a 50/50 mixture of hot water and downy.  I armed myself with my sprayer and scraper and away I went!

IMG_5583

I sprayed and scraped, and scraped and sprayed.  The floor was slick with Downy (although it did smell fresh and clean!  Behold the fruits of my labor:

IMG_5584

We really weren’t getting anywhere.  No matter how much I scraped it still seemed like there was glue everywhere. Sigh.  We went back to the drawing board and came up with a new plan!  We happened to have a wallpaper steamer that we borrowed from a friend.  It was definitely a very wet, 2 man job but it worked so much better!  The glue just melted off and we hardly had to put any effort into scraping!  Yahoo!

After we managed to get all of the glue down, we definitely had some repair to do.  The Mr.’s grandma loved hanging things on the walls, so we had quite a few holes to patch up.  A little bit of spackle, some sanding and a bit of cleaning and the kitchen was back to it’s original useful state, green walls and all.

IMG_5586

So that was weekend number 2.  It did take us a fair amount of nap and post bedtime hours to get it all done, but the walls are ready to be painted and primed.  The best part of the weekend?  We spent absolutely nothing on the project.  Zero dollars required.  That’s the kind of weekend project I like!

Have you ever tackled wallpaper?  Any tips for those that want to try?

Until next time …
The girl behind the lama
~LMM

Pin It!

Wednesday, June 29, 2011

What We Eat Wednesday

Time for another edition of What We Eat Wednesday!  Back to some freezer meals this week (OAMC).  We haven’t been using them as much as we should be.  We still have quite a few ready to go so we didn’t do the June OAMC menu, but we are hoping to do another batch in July.  We have been adding a few single freezer items lately to refresh our stock of breakfasts and random side items like double baked potatoes.  I think the goal is to do OAMC maybe every other month.  We’ll have to see what comes up!

Anyway, I digress.  You’re here to find out what we’re eating this week and maybe it’ll pop up on your menu for next week!

Sunday – Dinner at the in-laws

Monday – Grilled Gyros  (OAMC) – I swear one of these days it’s going to stop raining when I expect it to and we’re going to grill!

Tuesday – French dip with Twice Baked Potatoes (both from OAMC)

Wednesday – Slow Roasted Beef with Potatoes

Thursday – Creamed Chicken with Gnocchi Dumplings

Friday – Ravioli Lasagna


Freezer meals and sides we made this week:

Raspberry Lemon Muffins

Twice Baked Potatoes – I just kind of made my own recipe up, wrapped them up and froze them!

I didn’t plan anything for Saturday this week.  With it being the holiday weekend, I’m not really sure what our plans are so I’m leaving it empty for now.  Besides, if all goes well next weekend is resurface the kitchen counter weekend, so we’ll have to eat out anyway!!  Eek!!

Are you eating anything good this week?

Until the next time…
The girl behind the lama
~LMM

Pin It!

Monday, June 27, 2011

The Great DIY Kitchen Project–One Weekend at a Time–Weekend Numero Uno

Ah yes, DIY kitchen remodeling.  Scary, yes? To tell you the truth, we are terrified of ours.  How in the world are we supposed to go from this:

IMG_5553

to something along the lines of this:

image

We’re crazy right?  Can to relatively intelligent and moderately crafty people do this solo?  Why would we even try?  I’m delusional and the Mr. believes in my grand delusions.  We are armed with watching way too much HGTV,  just enough knowledge to be dangerous, Google, and YouTube (you’d really be amazed at how much you can learn watching YouTube tutorials!).

OK, so to be less overwhelmed by everything that eventually had to be done, we have (or are at least trying) to be happy knowing that the kitchen will get done, but it won’t be fast.  We’ll take it one weekend at a time and one paycheck at a time.  We’ve done remodeling before and it quickly becomes a money pit and it has gotten us into debt that we’d rather not have again.  So flat out – if we don’t currently have the money in our pocket or the designated bank account, it just isn’t happening.  If we want it we have to earn it. It’s kind of like being a kid again.  If you want to buy a toy, you have to do your chores, earn the money and save it so that you can afford it.  So simple, yet so hard for most adults.

Anyway, weekend number one is here!  What can we accomplish in one weekend??

Goals:
~ Get the colors and design ideas ready
~ Replace all the drawer pulls
~ Replace the old light fixture

Not so bad right?  Totally realistic for a weekend.

So what are we shooting for?  Here are a few things that we would like to accomplish:


image

A classy, cheery white kitchen with black counters and dark floors

image    image

Open shelving to display all of our Fiesta dishes and hang coffee cups

image   image

     Painted inner cabinets                                     Paintable wallpaper backsplash

image

A cheery place to eat with bright contrasting decorations.

So there you have it!  It seems like a lot of things that don’t go together, but I promise I at least *think* I know what I’m doing … famous last words.

So that’s the GOAL – let’s get to work!

First project – get rid of the light fixtures, that we think has been hanging there since around circa 1960. Here are the originals and their new replacements!

Exhibit A:

kitchen                IMG_5593


Yes that’s just an exposed light bulb.  Not sure why, but we found more than one of those in our house so it must have been intentional.

Exhibit B (plus exhibit A in the background):

Dining and kitchen     IMG_5589

How about that from outdated to fresh and cheery?  You can even see a sneak peak of weekend #2 projects because I’m terrible at getting pictures taken in a timely manner. 

Next up – new drawer pulls!  You have no idea how much they can change a room.  Ours actually were so old, they are now considered retro.  They actually were a pretty nice shape, but they were quite worn and just didn’t match what we were looking for. So out with the old and in with the new!


IMG_5550               IMG_5590

One last project that was by far the nicest change,  I have no idea why we didn’t do it sooner.  You won’t even believe it … we cleaned the cabinets – gasp!!!!  Yes a good old soap and sponge to wash 60 years of kitchen grease and sticky fingers off the white cabinets.  I think they still need a good coat of … something on the top to seal them a little bit, but what a world of difference!  Dirt be gone!

So that was weekend #1.  To be honest, the Mr. hung the new light fixture in about an hour while short stuff napped.  The rest we did in about 3 hours after he went to bed.  Total cost of weekend #1? 

$174.07

We spent $80 on the chandelier, $94 on 47 new drawer pulls and the third light fixture we already had from a previous remodeling project.

Not bad for some pretty big changes and just a few hours of work.

Until the next time …
The girl behind the lama
~LMM

Pin It!

Wednesday, June 22, 2011

What We Eat Wednesday

We are taking a small break from Once a Month meals this week.  I’m in the mood to get dirty in the kitchen and whip up some fabulous dinners, so here’s what we are eating this week!

Sunday – Father’s Day dinner with the in laws!

Monday – Fragrant Fried Rice Pilaf

Tuesday – Baby Back Ribs with Potatoes Maureen  (aka. Cheesy Potatoes)

Wednesday – Steak Salad

Thursday – Grilled Beef, Tomato and Lemon Kebabs with leftover potatoes Maureen

Friday – Beef Stroganoff

Saturday – Grandma Sue’s Perfect Pasta (Note: I do not have a Grandma Sue, but her pasta sure does sound tasty!)

If there is something listed that I haven’t linked a recipe to, give me a shout out and I’ll make a post about it! 

Are you eating anything good this week?  Leave a comment if you are!  I love new recipes to try!

Until the next time …
The girl behind the lama
~LMM

Pin It!

Monday, June 20, 2011

My Kitchen Needs Help!

We moved into our home about 2 years ago.  It was my husband’s grandfather’s house.  We didn’t really intend on staying more than a few months until we found a place of our own, but once you move into a place and get settled, who wants to move?  It definitely needed major updates.  Most things hadn’t been updated since the early 80’s.  We actually found a picture of the “new kitchen” from 1983 … it actually predates the hubby. It’s now 2011 and we still have the same wallpaper, linoleum floors, cabinets, counters, backsplash, and yes – even the same microwave.  It’s a fabulous space, but it just needs a little love.

While we did replace the microwave and dishwasher when short stuff was born, that was where we stopped.  Did we really want to put the work and money into it?  We have been putting it off, but are finally taking the plunge!  We don’t have a lot of money, and lets face it – we love a good DIY challenge, so we are going to attempt to refinish it on our own.  I’ll admit that I’m also a bit stubborn about home improvement.  I’m pretty delusional about it. See, I grew up with a dad that did everything.  He wanted to put a skylight in?  He cut a hole in the ceiling, and it was there!  He wanted to create a cathedral ceiling?  He just busted through the drywall, reframed it and poof!  I am finally starting to realize (now that I’m 30), that not all men are that handy.  In fact, most families probably hire people to do these projects.  The hubby is still in trouble though because I believe that we can do it.  We watch enough HGTV and isn’t that why there are YouTube videos for everything??

There is a lot to do so we started off by making a list of all of the projects and then breaking them down into manageable weekend projects. We think we can get our updates done in just 6 weekends.  6 total weekends, not consecutive.  We never use a credit card, so things will happen when the budget allows. 

Here’s what our kitchen looks like now (OK almost now … I didn’t get pictures in before we replaced the really outdated light fixture, so you get a sneak peak of weekend 1!)

IMG_5550

Outdated cabinet handles, grimy, sticky cabinets, and a backsplash that is the same outdated laminate as the counter top.

IMG_5549

We still aren’t sure why there is partially painted pegboard behind the stove …

IMG_5551

Oh, the lovely backsplash and the grimy cabinets and sticky drawers.

IMG_5553

Another lovely pegboard wall, the handy dandy trash compactor, and the sticky linoleum floors.

dining and luke

The lovely gold light fixture (and our dog Luke!) – that’s my sunroom/office in the background!

IMG_5556

The back door, a bank of cabinets.

IMG_5555

The blue striped wallpaper is actually kind of neat, but it’s peeling up and is full of stains and 30 years of kitchen grease.

A lot of work?  Yes.  Expensive?  We hope not.  The goal is to spend around $1500 (hopefully less).  That’s right.  A total kitchen makeover for $1500 or less. I feel like I’m on Design on a Dime!  With a little creativity and some sweat … I think it might just come together!

Stay tuned for projects as we go!  What remodeling projects are you tackling?

Until the next time…
The girl behind the Lama
~LMM

Pin It!

Thursday, June 16, 2011

Stuffed Pork Chops–Fresh Style!

OK, So I’m one of those cooks that likes things natural.  I’m not into cage free, range free, totally preservative free cooking.  I just like to know where my food comes from.  I like to know that my gravy is made from the crusty brown bits at the bottom of the pan, butter, flour and low sodium, fat free chicken stock.  There are no artificial colorings or preservatives.  I know what seasonings I added and for the most part the sodium content.  Have you ever looked at the sodium in a jar of gravy?!?!!? There are some that I use, such as stuffing mix used here, but that’s about it.

One of my other big pet peeves is “cream of” soups.  I wish I could wipe them off of the planet.  I don’t believe that the bits in the cream of mushroom are actually fresh mushrooms, I have no idea what they used to make it, and if it comes out of a can in one large sticky clump, it creeps me out.  Now my mom used them all the time growing up, but my stomach just can’t handle it.  Literally.  Since I started cooking my own food from scratch, anything that has that many preservatives doesn't settle well.  Lets not even talk about the day a few weeks ago that I was craving a good old blue box of mac and cheese.  It was rough for awhile.
So that brings me to stuffed pork chops.  Traditional, home style food.  Basic recipe uses a can of cream of mushroom soup dumped over the pork chops and baked.  No thank you.  Did you know that you can make your own cream of mushroom sauce in about 10 minutes??
Here’s my very own recipe for you to enjoy!

Stuffed pork chops

Serving size: 2 adults, plus one 10 month old

Ingredients

2 bone in pork chops about an inch or two thick
2 cups of stuffing mix (or day old bread cubes seasoned to your liking)
2 T melted butter
about 1/4-1/2 C chicken stock (enough to moisten your stuffing)
1 rib celery chopped
1/2 onion chopped
1/2 a box of sliced button mushrooms
2 sprigs of thyme (or about 1 teaspoon dried)
2 T flour
about 1 1/2-2 cups chicken stock

I’m all about kitchen efficiency so before you even start cutting anything, preheat your oven to 375 and get your pork chops cooking.  Heat a pan large enough to fit all of your chops on medium high.  Once it’s hot, add in a few tablespoons of olive oil and cook your pork chops for a few minutes on each side, you want them to be lightly browned but not cooked all the way through.  It is absolutely essential to wait until your pan is hot!  Never put meat on a cold or warm pan.  The heat sears the meat which not only gives you the lovely crusty outside, but also the juicy inside. 

IMG_5515

Don’t sit and stare at them!  While they brown, use that time to chop up your onion and celery for the stuffing!  Multitasking at it’s best!  Once your chops are browned, take them out and just let them hang out on a plate until you are ready for them.  In the very same pot toss in a little more olive oil, half of your onion and the celery.  See what we’re doing here?  The more you use the pot, the more those little crusty bits of flavor accumulate in your pan.  You know all those little browned bits at the bottom?  That’s exactly what creates yummy goodness of flavor in your sauce.  You want them there so resist the urge to clean them out after each bit of cooking!  OK, so you’re cooking your onions and celery for about 3-5 minutes.  You just want them to be a little soft, but not totally cooked – they’ll finish cooking in the oven. 

While those are cooking, start getting your stuffing ready. Put the stuffing mix into a bowl with the melted butter and chicken broth (or chicken stock if you have it, either is fine!).  Let your eyes be the judge of how much stock you need!  It really depends a lot on the brand of stuffing mix you use, or the texture of your own day old bread.  You want all the water to soak in and leave the bread moist, but not so moist that it’s sitting in a big pool of liquid. Once your veggies are all cooked up, add them to the stuffing mix, give it a stir and let it hang out for a bit.

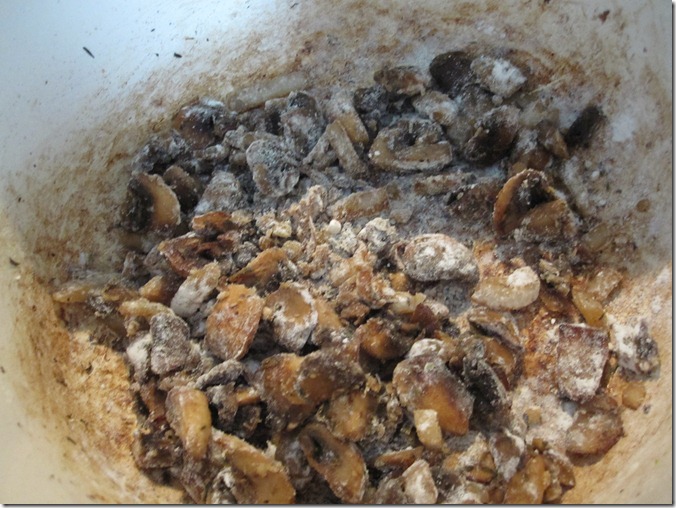
Go back to your very same pot (one pot wonder meal!).  Add in about 2 tablespoons of butter.  You want butter here, not olive oil – you’ll get a much better gravy!  Let the butter melt and throw in your mushrooms thyme, and the other half of your onion.  Now, feel free to add as many as you like.  We personally like the flavor of mushrooms, but not really eating the mushrooms, so I tend to use about half a box and I chop them up pretty small.  Resist the urge to season!!  Salt pulls the water out of them and will make them very tough and chewy so always salt them after they are cooked.  They’ll probably cook about 5-6 minutes before they are dark and meaty looking.

IMG_5518

See all the lovely brown bits that I’ve accumulated? So my mushrooms are cooked.  Now it’s time to make the sauce!  Toss in about 2 tablespoons of flour.  You are making a roux, the base of your sauce.  Stir it up and make sure you cook it for about a minute.  You want to cook off the flavor of the flour.  Make sure it’s not much more than a minute though otherwise you risk cooking off the glue that will pull your chicken stock to a nice, thick, sauce.
IMG_5519

Once you’ve let it cook for a few minutes start adding your chicken stock.  I also like to play the quantities by ear.  Add in about 3/4 c to 1 cup to start off with.  Stir it up and make sure you get any clumps of flour dissolved and that you scrape up all of those tasty brown bits at the bottom.  Then let it cook.  It needs to heat up a bit before it starts to thicken.  Always start with small amounts of liquid!  It’s easier to thin a sauce out than it is to make it thicker.  Keep adding until you have a thick gravy. I apologize for not having a picture. I was so excited to get dinner in the oven I forgot!

Once your gravy is as thick as you want it, you are ready to assemble!  I personally don’t care to take the time to slice my pork to actually stuff it.  It all tastes the same and it all falls out when you try to cut into it, so why bother?  I prefer the unassembled method so I get extra crunchy dressing on top.  Put each pork chop down in a baking dish.  Put the stuffing in big scoops on top.  Use the rest of the stuffing to fill the rest of the pan.  Then pour your yummy mushroom sauce over everything.  Cover and bake for about 30 minutes.  If you want extra crispiness on top, uncover and broil for a minute or two.

I served it up with some steamed broccoli and purple cauliflower and voila! Dinner!

IMG_5520

You know what the best part was?  I cut off chunks of pork and put it in the blender with some stuffing, broccoli and cauliflower and made a little baby puree for my little one.  I felt confident enough with this meal that he was getting fresh ingredients that weren’t full of too many things he shouldn’t be eating.  He absolutely loved it and ate every last bite of it.  Who says the baby has to eat Gerber mush?  Not my baby that’s for sure!

So try it out!  Just skip that can of cream of mushroom soup just this once and tell me that this wasn’t easy, healthy and way more tasty!

Please, please please, if you have any questions or don’t understand what I mean by something – ask me!  I’m a pretty confident cook, so I tend to forget sometimes that not everyone else is. Enjoy!

Until the next time,
The girl behind the lama
~LMM
Pin It!

Wednesday, June 15, 2011

Menu Plan Monday … er… Wednesday

I always have high hopes of putting up a menu planning post.  Usually most people do these on Monday.  What do you care?  Menu Plan Monday has a catchy ring to it, but what about What We Eat Wednesday?  Dare to different.

I’m still working on the last Once a Month Cooking Post (OAMC) so stay tuned, but hopefully this will help you envision how I use the meals to make my cooking week a little easier, especially in the heat of summer!

So here's what we're eating this week:

Monday - Honey Mustard Pork Chops (OAMC) with roasted asparagus and Butter and Parm Squished Potatoes

Tuesday - Stuffed Pork Chops (I will blog about this one later!) with steamed broccoli and purple cauliflower

Wednesday – Stuffed Bell Peppers with Chicken, Asparagus and Mozarella

Thursday – BBQ Enchilladas (OAMC) with Summer Salad

Friday – Meat Loaf (OAMC) with mashed sweet potatoes

Saturday – Gyros (OAMC) and Zucchini bake

If there is something listed that I haven’t linked a recipe to, give me a shout out and I’ll make a post about it! 

Are you eating anything good this week?

Until the next time …
The girl behind the lama
~LMM

Pin It!

Wednesday, June 8, 2011

First, you have to ask

Ask, and it shall be given to you; seek, and ye shall find; knock, and it shall be opened unto you. – Matthew 7:7

I was reading the daily selection in the book Simple Abundance: A Daybook of Comfort and Joy and was really inspired.  The concept of the lesson?  Just ask for help.

As I’m sure is common, many women – especially mothers – spend most of their day worrying about those around them.  It is so easy to put everyone else's needs above our own. Of course the kids need to play, everyone needs to eat, the house needs to be clean, the school needs an extra hand, your friend needs a shoulder to lean on, the dog needs to go to the vet … the list goes on and on. So what do you do for yourself?

I thought about that and realized that there isn’t much that I do for myself without feeling guilty.  Sure, I work because I enjoy it, I read because I enjoy it – but why is it that I do all of these things and still feel guilty, like I’m taking something away from someone else who really needs my time?

I’m slowly discovering that it’s OK to ask for help.  Step one:  I asked my husband to watch the baby Saturday morning so that I could go swim laps at the pool and read a book.  It was so simple. He immediately said, “Yes!  Absolutely! GO!  Get out!” 

A few days later we had a small accident at home involving the baby and our dog.  I won’t go into the details, but it ended up with a perfectly happy baby that had a few cuts glued shut on his face and a pretty hysterical mommy.  I really felt like I just needed support and wanted to call a friend, but immediately said, “No.  She’s busy.  She has her own problems.  She doesn’t need mine on top of hers.”  I kept debating and it dawned on me, that’s what friends are for.  Friends are there to help you when you need it the most.  Sure, they’re there for a random cup of coffee, or a play date at the pool – but what they are really there for is in times like this.  Times when you need someone to assure you that it was just an accident, it could have happened to anyone, the baby is fine, and you aren’t a terrible mother.

So I called, and you know what?  I was right.  She dropped everything and came over and that was just what I needed.  All I had to do was ask. 

So why not ask for help when you need it?  The worst that could happen is that person says no and you’re back to square one.  At least you tried right? 

All you moms out there that do things for everyone in the world, but not for yourself – ask someone for help.  Ask someone to watch your kids so that you can go for a walk – alone, or to a movie, or to the mall.  It’s OK, it’s more than OK and you’ll be a better mom for it. 

I’m a work in progress, but maybe some day I’ll ask for help without debating it for an hour first.

Until the next time …
The girl behind the lama
~LMM

Pin It!

LinkWithin

Related Posts Plugin for WordPress, Blogger...

Envelopments